
We love placemats, because they are such a versatile table setting option. You don’t need nearly as much fabric as you do for an entire tablecloth. In fact, with their smaller proportions, they’re a great way to bring together a number of colors, patterns, and textures. Our table for two includes lovely quilted and appliquéd placemats.
Their accent bands feature a diamond quilting pattern, while the main place-setting panels have repeating rows of parallel straight stitch quilting. Picking different styles of quilting within one project is a simple yet striking way to add a little spice. If you like this look, check our the Tea Time Napkins, Kitchen Towels, and the pretty Tea Time Half Apron.
The used a beautiful natural linen and a bright quilting cotton as the accent fabric as well as for the tea time appliqués.
Sewing Tools You Need

- Sewing machine and standard presser foot
- Satin Stitch foot; optional, but helpful for precision stitching and quilting
- Open Toe Satin Stitch foot with Quilting Guide Bar; optional, but helpful for precision stitching and quilting
Fabric and Other Supplies

Supplies listed below are for TWO placemats; multiply as necessary for your tea party. Our placemats finished at 20″ wide x 14″ high.
- Two Layer Cake squares (we used just two of the forty-two 10″ x 10″ squares in a standard pack; if you choose not to use a Layer Cake, you’ll need to cut two 10″ x 10″ squares from your selected fabric – or at least find two scraps of fabric from which to cut your appliqué pieces): we originally used Lily & Will by Bunny Hill Designs for Moda Fabrics in the Aqua and Brown colorway
- ¾ yard of 44-45″ wide linen: we originally used a medium weight natural linen
NOTE: Linen often comes in very wide widths, which simply means you could make additional mats from less yardage. - ½ yard of 44-45″ wide coordinating print fabric: we originally used Sugar & Spice in Sugar Floral White by The Quilted Fish for Riley Blake Designs
- Fusible/transfer web: we used Wonder Under
- Pressing cloth
- ¾ yard of lightweight batting: we used Kyoto Bamboo Batting
- All purpose thread to coordinate with fabrics: we used Celedon for topstitching
- All purpose thread to accent fabrics for appliqué: we used Summer Brown
- Freezer paper (optional)
- See-through ruler
- Iron and ironing board
- Scissors or rotary cutter and mat
- Small, sharp scissors for appliqué cutting
- Fabric pen or pencil
- Straight pins
Getting Started and Templates Download
- Download and print the Kitchen Tea Time Shapes Template. For this project you’ll use the ‘Large Teapot’.
IMPORTANT: This pattern consists of ONE 8½” x 11″ sheet. You must print the PDF file at 100%. DO NOT SCALE to fit the page. - Select your two Layer Cake squares (or cut fabric pieces) from which you’ll create your two teapots. Set aside.
NOTE: Follow our design or pick and choose your own favorite combination. - As mentioned above for our supplies list, our cut instructions are for TWO placemats.
- From your accent fabric (Sugar & Spice in our samples), fussy cut TWO strips each 15½” high and wide enough to include two complete rows of large flowers plus a ½” seam allowance on both sides. Ours measured 3¼” + ½” + ½” = 4¼”. So, we cut two strips 15½” x 4¼”.
- Based on this width, and knowing that we wanted out placemats 20″ wide when finished we figured the base fabric cuts. You could certainly adjust your sizes slightly to best accommodate your fabric.
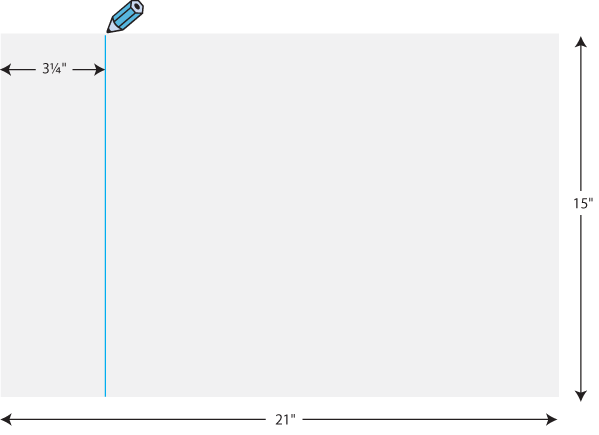
- From your base fabric (natural linen in our samples), cut FOUR 21″ wide x 15″ high rectangles, two for the placemat fronts and two for the placemat backs.
- Using one of these BACK base pieces as a guide, cut two pieces of the thin batting just slightly larger than the linen.
- For detailed step-by-step instructions, and options, for preparing your appliqués, see our Tea Time Apron tutorial.
NOTE: As we did in our apron project, this placemat project includes regular appliqué (the two large teapots) as well as two small, fussy cut flower motifs cut from the coordinating strip fabric (the Sugar & Spice in our sample) to be used as ‘second level’ appliqué accents on the teapots. If you’d like to use this same embellishment, prepare these flowers at the same time as your other appliqués. The steps in the Apron tutorial show these being cut and applied.
At Your Sewing Machine & Ironing Board
- Place one piece of batting flat on your work surface.
- Center one of the pieces of base fabric (natural linen in our sample) right side up on the batting.
- With your fabric pencil, draw a line along the left side of the base piece 3¼” in from the raw edge.
- Find one accent strip (Sugar & Spice in our sample). Press under each long raw edge ½”, so your folded and pressed strip is now 1″ smaller in width than when cut. In our sample, our strip is now 3¼”.

- Unfold the strip so you can see the creases. Place the strip, right side down on the base piece, aligning its left raw edge with the drawn line. In other words, your accent strip is to the inside of the line, facing towards the middle of the placemat not towards the raw edge.

- Stitch the strip in place through all the layers (batting, base and strip), following the crease line with your stitch line, which is ½” from the base fabric’s drawn line. Therefore, this line of stitching will result in a ½” seam allowance.
- Press the strip back, so it is now right side up and the raw edges of the base piece and the strip are flush. Pin in place.

- Add additional pins around the edges as well as some in the middle. The quilting steps are next and you don’t want your layers to shift.


Quilting stitches
- The quilting stitches are only done on the FRONT placemat piece.
- Lengthen your stitch and quilt diagonally across the strip, first one direction then the opposite direction to form a diamond pattern.
- We used the centers of the motifs on our Sugar & Spice fabric a guide. The strip is narrow, so simply picking points on the fabric as a stitch guide, as we did, is easy to do. However, if you are new to quilting or if you want more precise control, you can first draw the diagonal lines on the accent strip with a fabric pen or pencil (make sure your pen/pencil will easily wipe away or disappear with exposure to the air or the heat of an iron).
- Your diagonal quilting stitch lines (and your drawn lines) should extend only from the seam line of the strip/base to the raw edge.

- With the accent strip quilted, the next step is to add parallel vertical lines of quilting across the base fabric of the front of the placemat.
- Using the vertical strip/base seam line as your starting point, quilt parallel vertical lines 1″ apart, moving from the strip/base seam line to the right until you reach the raw edge. We used our Janome Open Toe Quilt foot with the quilting guide bar. The quilt bar runs along your previous stitch line, keeping your new stitch line perfectly parallel. The bar is adjustable so we could adjust to our 1″ width. If you do not have a quilting guide bar option on your machine, you can simply draw lines onto the base fabric to follow.


Positioning the appliqués
- We wanted out teapot appliqués to be positioned in the bottom right corner of each placemat. To figure out this positioning, remember to account for your ½” seam allowance at the raw edges. We placed pins at the ½” mark to help with positioning. You could also use drawn lines.

- For detailed step-by-step instructions, and options, for stitching your appliqués, see our Tea Time Apron tutorial. As mentioned above, remember you will first stitch your teapot appliqué in place and then stitch the second-level flower motif appliqué in place.
- Trim off the excess batting around all four sides of the placemat front so all the raw edges are flush (a rotary cutter and ruler is best for this step).


Finishing the placemat
- Find your placemat back piece. Place the finished quilted placemat front and plain placemat back right sides together. Pin well.
- Using a ½” seam allowance, stitch around all four sides, pivoting at all the corners. Leave a 4-5″ opening along the accent border edge for turning.
- Clip the corners diagonally being careful not to cut through the stitching.

- Turn the placemat right side out through the opening. Use a blunt end tool, like a large knitting needle, chopstick or point turner to help push out the corners so they are as square as possible.
- Press in the raw edges of the opening so they are flush with the sewn seam.
- Edgestitch around all four sides, which will close the opening and further secure all your layers.
- Repeat to finish your second placemat.


Project Design: Alicia Thommas
Sample Creation: Kathy Andrews, What Sew Ever

These are really cute!
Thanks, Eva! I hope you’ll give them a try.